

AI-Powered Support
Support doesn't scale when every ticket requires manual attention. AI-powered support in Mantle lets you create intelligent agents that automatically analyze tickets, suggest responses, and handle routine inquiries—so your team can focus on the conversations that truly need a human touch.
Mantle gives you three ways to use AI in your support workflow, depending on how much control you want:
- Suggested responses — AI drafts a reply, you review and edit before sending (human in the loop)
- Auto-responses with Flows — AI automatically replies to tickets based on triggers you define
- Chat widget AI — AI responds to live chat messages instantly, no human needed
The Support Sidekick
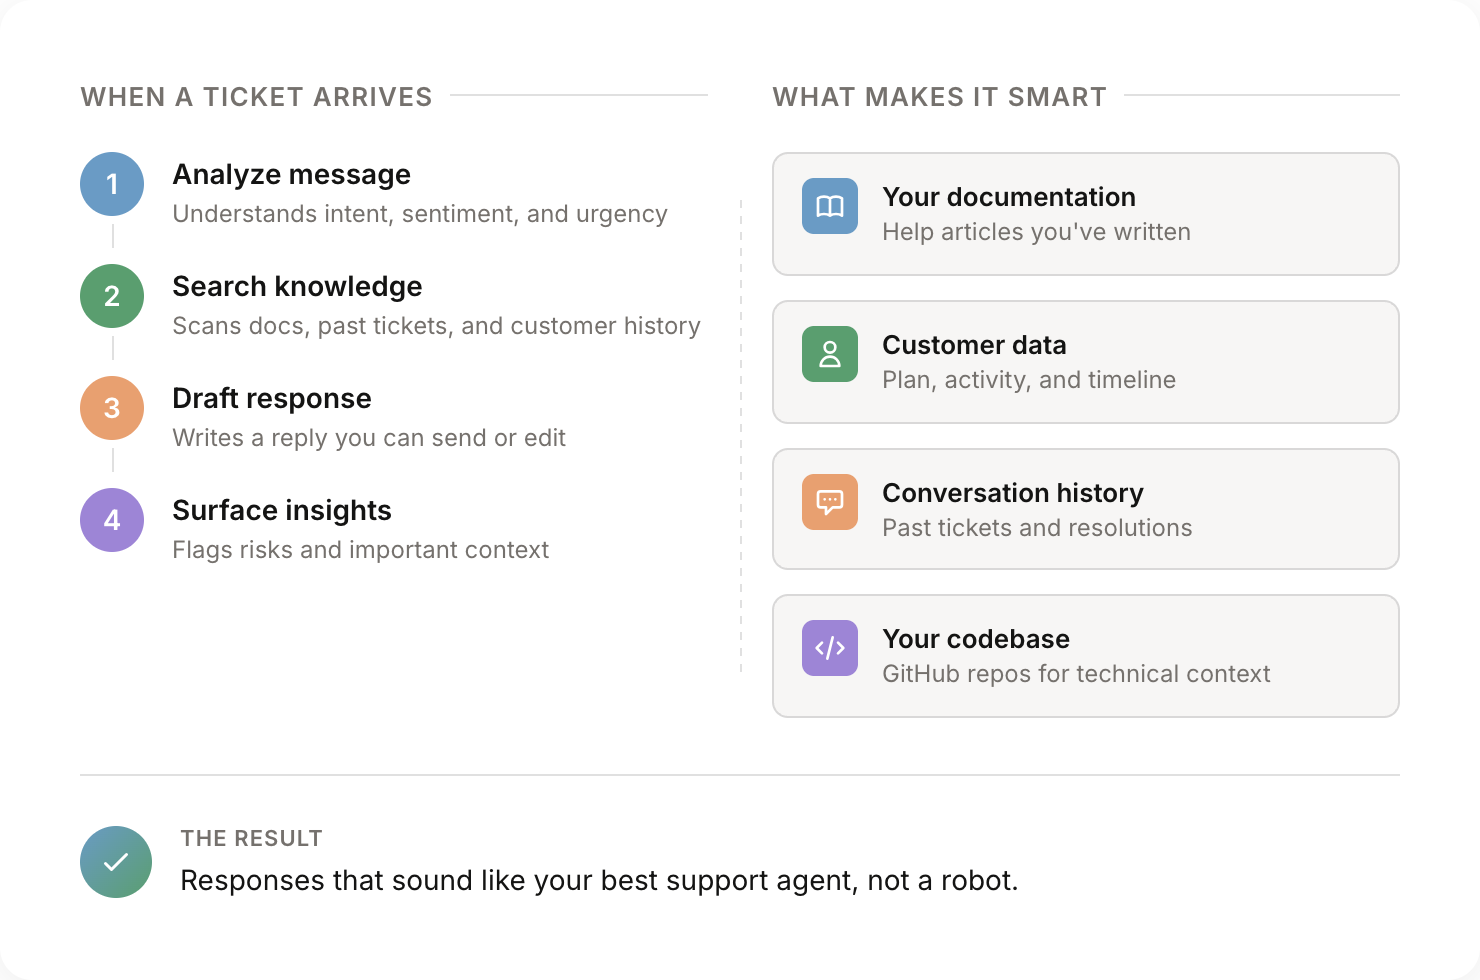
Mantle ships with a built-in support agent called the Support Sidekick. It's designed specifically for help desk workflows and comes pre-configured with the right tools and context to start helping immediately.
When a ticket comes in, the Support Sidekick follows a structured workflow:
- Context gathering — Pulls the customer's plan, subscription status, usage history, and recent activity
- Research — Searches your documentation, codebase, and similar resolved tickets to understand the issue
- Classification — Determines if it's a simple answer, feature limitation, bug, unclear issue, or complex setup question
- Response — Drafts a complete response for your review, or recommends escalation with context
The Sidekick is smart about different question types. For "how do I" questions, it provides instructions and links to documentation rather than pulling live data. For bug reports, it researches the codebase and flags likely causes. For billing questions, it checks the customer's actual subscription and transaction history.
You can trigger the Support Sidekick from the magic wand button in any ticket's reply composer, or use the
/cshandle in Mantle chat.
To customize how the Support Sidekick behaves—adjusting its tone, adding product-specific guidelines, or connecting your codebase—see Configuring your agents.
Setting up suggested responses
Suggested responses let AI draft a reply that you review before sending. This is the safest way to get started with AI support since you're always in control.
How to use it
- Open any ticket in your help desk
- In the reply composer at the bottom, click the magic wand button (✨) in the toolbar
- The AI suggestion modal opens and automatically starts analyzing the ticket
- Wait for the agent to generate a response — this usually takes 10-30 seconds
- Review the suggested response in the modal
- Click Apply to insert it into your reply composer, or Dismiss if it's not helpful
- Edit the response as needed, then click Send
Regenerating a suggestion
If the suggestion isn't quite right, you can ask the AI to adjust it:
- In the suggestion modal, type what you'd like changed in the "Adjust response" field (e.g. "make it more friendly" or "include a link to the billing docs")
- Click Regenerate
- The agent will create an updated suggestion based on your feedback
When to use suggested responses
Suggested responses are best when:
- You're getting started with AI support and want to build trust in the quality
- Tickets require nuance or contain sensitive information
- You want to train your team on what good AI-assisted responses look like
- Your agent has codebase access (we recommend human review for code-informed responses)
Setting up auto-responses with Flows
Flows let you automate AI responses so tickets get answered without manual intervention. You define when the AI should run and what it should do.
Quick start with a template
The fastest way to get started is to use the built-in flow template:
- Go to Flows in the sidebar and click Create flow
- Select the "AI auto-reply to support tickets" template
- This sets up a flow that auto-responds to support tickets using an AI-powered support agent, with automatic escalation if required
- Review the pre-configured trigger, conditions, and actions
- Customize as needed (e.g. adjust which tickets it applies to)
- Activate the flow
Creating a flow from scratch
If you want full control, you can build your own flow:
- Go to Flows in the sidebar and click Create flow
- Set the Resource type to Ticket
- Click Add trigger and select Ticket is created (or Ticket message is received for follow-up messages)
- Optionally add conditions to filter which tickets trigger the flow (e.g. only tickets with certain tags or from specific customer segments)
- Click Add action and choose one of:
- Reply to ticket — Send a message directly to the customer
- Create response suggestion — Generate an AI suggestion for your team to review (human in the loop)
- Run AI agent — Run a custom agent with instructions and get structured output
Example: Auto-suggest on every new ticket
This flow generates an AI suggestion for your team to review whenever a new ticket arrives:
- Trigger: Ticket is created
- Action: Create response suggestion
- Select your Support Sidekick agent
- Save and activate the flow
Your team will see AI suggestions appear in the ticket sidebar automatically — no need to click the magic wand each time.
Example: Auto-reply to common questions
This flow sends an AI-generated reply directly to the customer:
- Trigger: Ticket is created
- Action: Run AI agent
- Select your support agent
- Instructions: "Analyze this ticket and draft a helpful response. If you're confident in the answer, provide it. If not, let the customer know a team member will follow up."
- Action: Reply to ticket
- Use the agent's output in the reply content with Liquid variables
Customizing escalation and routing
The auto-reply template comes with default escalation behavior — the AI decides whether to reply, escalate, or skip based on its instructions. But you have full control over how escalation works by customizing three things: the AI agent's instructions, the output schema, and the flow steps that act on the agent's output.
This lets you set up multi-tier escalation, route tickets to different teams based on issue type, and handle operating hours routing — all within the flow editor.
For the full walkthrough, see Customizing AI Auto-Reply Flows.
Using conditions for smarter routing
Add conditions to your flow so AI only responds in specific situations:
- Only auto-reply during off-hours
- Only for tickets tagged with specific topics
- Only for customers on certain plans
- Skip VIP customers who should get human attention
Available ticket triggers
- Ticket is created
- Ticket message is received
- Ticket is updated
- Ticket is closed / re-opened
- Ticket priority or status changes
- Ticket is assigned to an agent or team
- SLA breach is approaching / SLA is breached
For more on building flows, see Flows and Using agents in Flows.
Setting up chat widget AI
Connect an AI agent to your chat widget to provide instant, automated responses to customer inquiries. Chat widget responses are fully automated — no human review step.
How to set it up
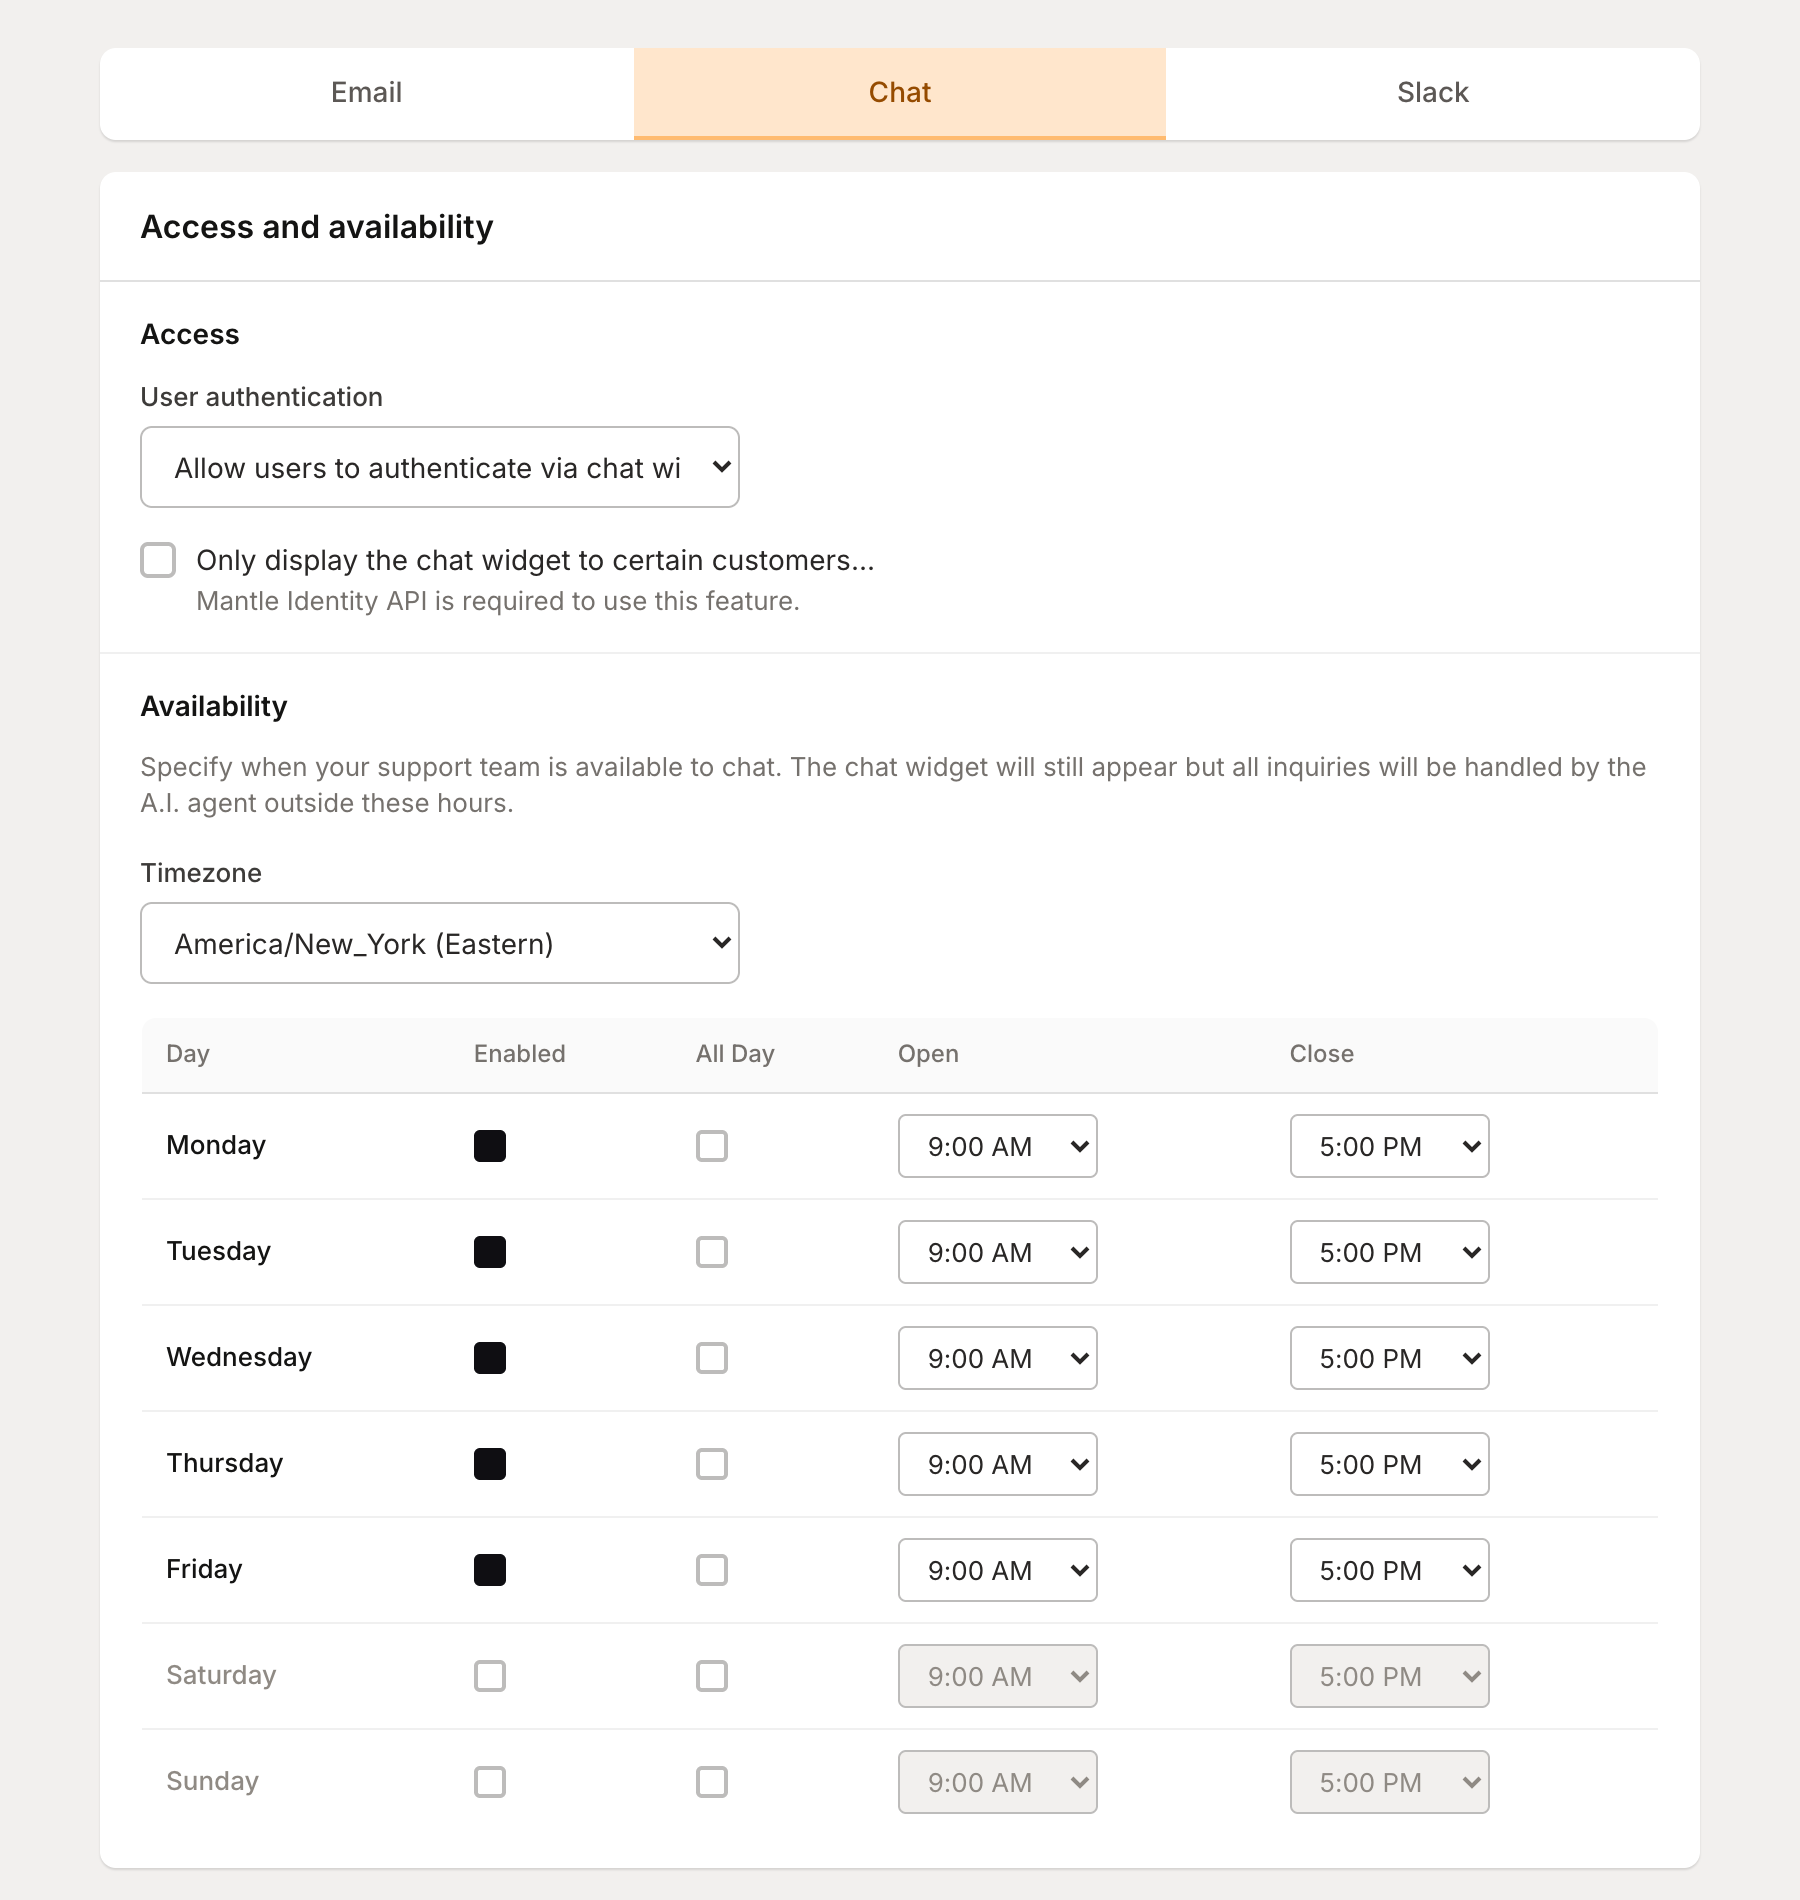
- Go to Help Desk > Settings > Channels
- Select your Chat channel (or create one)
- In the channel settings, find the AI automation section
- Select which AI agent should handle conversations
- Configure when AI should respond (all messages, or only when no agents are online)
- Save your changes
How it works
- Customer sends a message through your chat widget
- The assigned AI agent analyzes the message and your documentation
- Agent generates and sends a response automatically
- If the agent can't resolve the issue, it escalates to a human
AI responses are clearly marked so customers know they're chatting with an automated assistant.
Autoresponders
You can also set up simple autoresponders that don't use AI:
- First response autoresponder — Automatically reply to new chats with a static message (e.g. "Thanks for reaching out! We'll be with you shortly.")
- Post-closed summary — Automatically email a chat transcript to the customer when the conversation ends
Configure these in your chat channel's Autoresponders section.
Make sure your agent is well-configured and tested before enabling chat widget AI. Use the agent debugger to simulate conversations first.
Getting started with AI support
AI support builds on Mantle's AI agents feature. The Support Sidekick is ready to use out of the box, but you'll get better results by giving it context about your product.
A well-configured support agent can:
- Analyze incoming tickets and draft responses based on your documentation
- Provide customer context and history at a glance
- Identify escalation needs and customer sentiment
- Handle routine questions through automated chat
- Auto-tag tickets by topic for better routing and reporting
Auto-tagging and triage
When a new ticket arrives, Mantle can automatically tag it based on the content. This happens before any agent runs—it's a lightweight classification step that helps with routing and reporting.
Auto-tagging works by analyzing the ticket content against your organization's tag list. It learns from your previously tagged tickets to improve accuracy over time. Typically, each ticket gets 1–2 tags.
You can customize which tags are available in your organization's help desk settings. Common tags include:
- Bug report, Feature request, How-to question
- Billing, Account, Integration
- Urgent, VIP customer
Auto-tagging is enabled by default. You can disable it in your organization settings if you prefer to tag tickets manually.
Auto-tagging only applies tags that already exist in your tag list—it never creates new tags on its own.
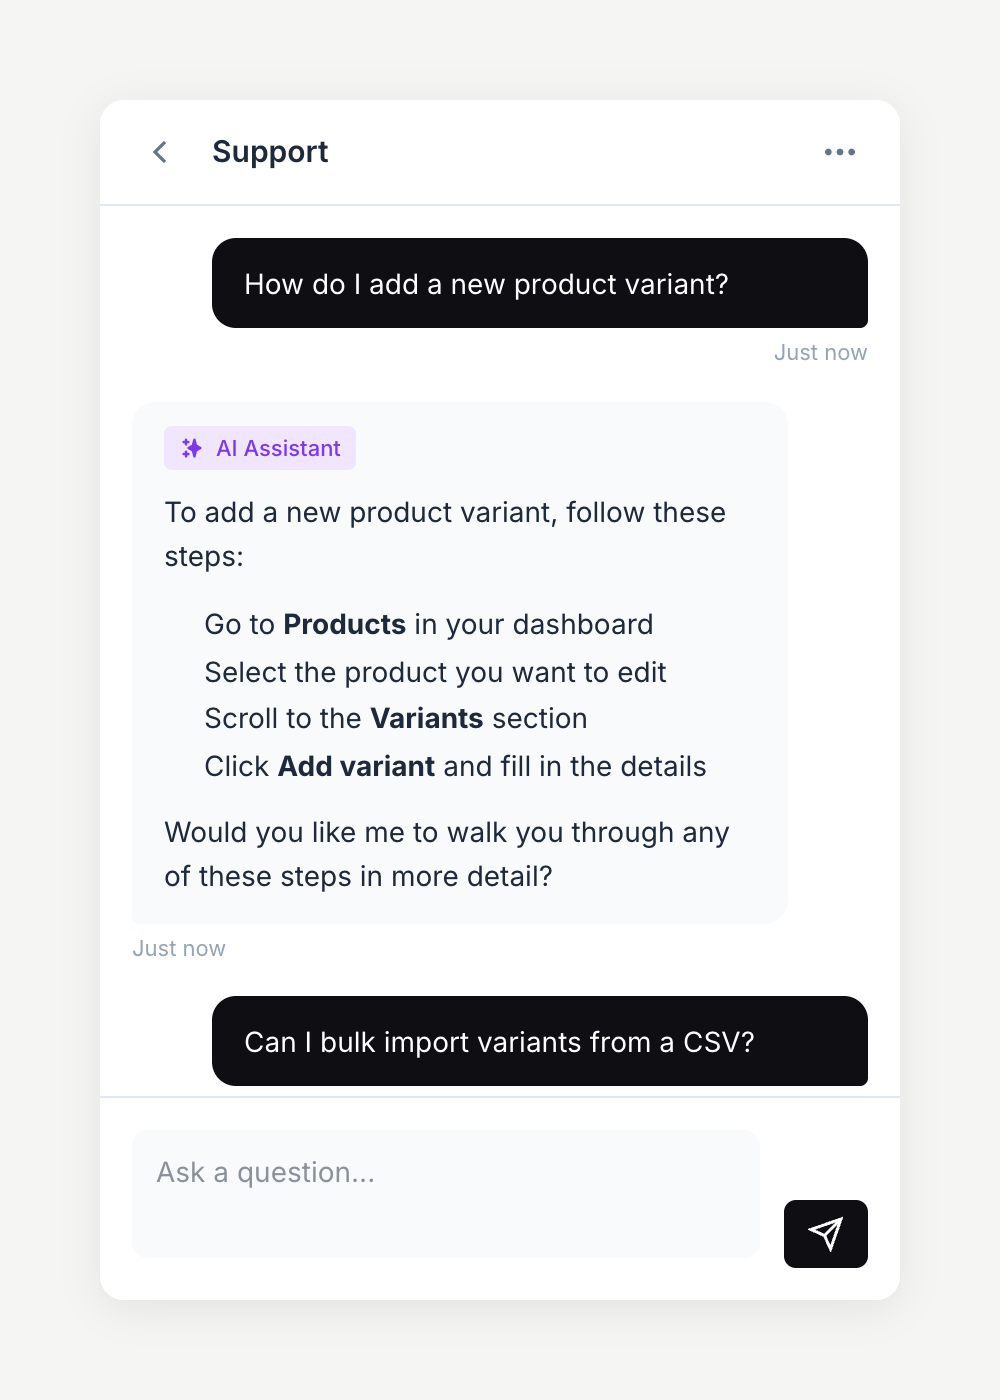
Response suggestions
When an AI agent analyzes a ticket, it generates a suggested response that appears directly in your help desk. These suggestions save time by drafting contextual responses based on the customer's message, your documentation, and the customer's history.
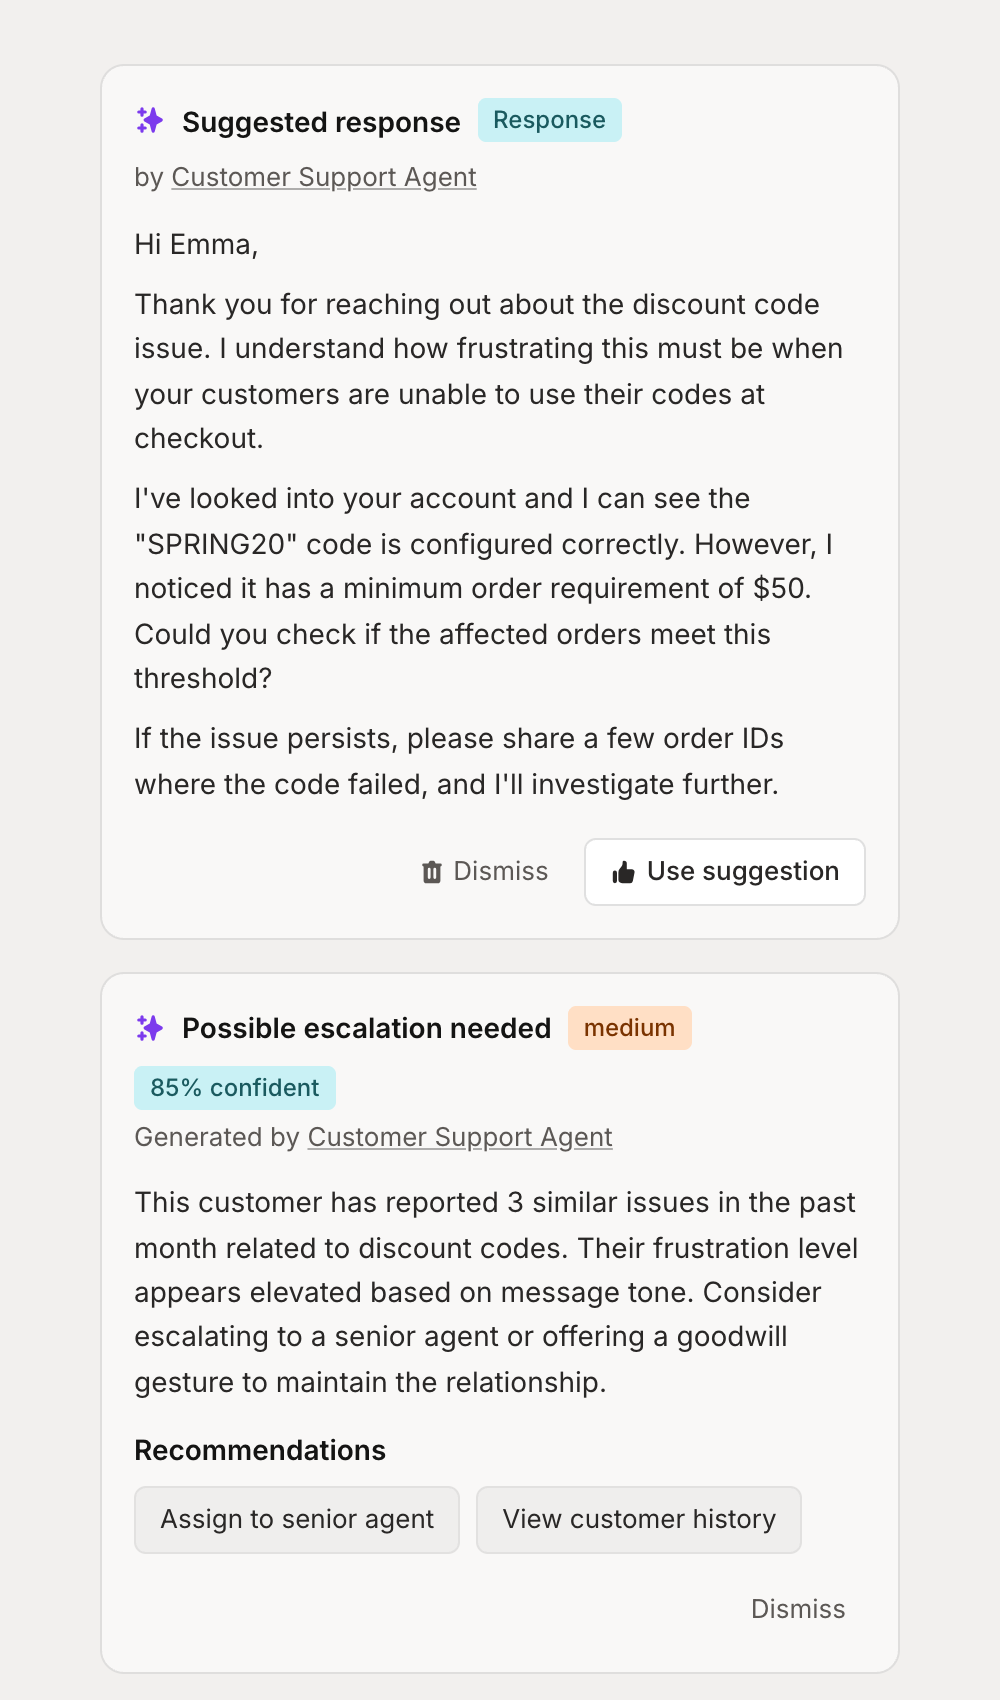
Every suggestion goes through a quality validation step before it's shown to you. The agent checks its own response for accuracy, tone, and completeness—and only surfaces it if it passes.
When a suggestion appears, you can:
- Review and edit the response before sending
- Use the suggestion as-is with one click
- Dismiss it if it's not helpful
This keeps humans in the loop while dramatically reducing the time spent drafting responses to common questions.
Adding your codebase for technical support
For technical products, the best support comes from understanding the code itself. You can connect your codebase to Mantle, giving your AI agents the ability to search through your actual implementation when helping resolve tickets.
When a customer reports a bug or asks how something works, your agent can search the relevant code, understand the logic, and provide accurate answers—not just generic responses.
Connecting your code
Codebases are connected at the app level in your app's settings page. To connect one:
- Go to Apps > select your app > Settings
- Find the Codebase card and click Connect codebase
- Choose your connection method:
- GitHub — Connect a repository directly from GitHub
- GitLab — Connect a repository from GitLab
- Upload — Upload a zip file of your codebase
Once connected, Mantle indexes your code for semantic search. To give an agent access, go to the agent's configuration page and select the app under the Codebase access section. Multiple agents can share the same codebase—you only need to connect it once per app.
Your code stays secure
We take the security of your codebase seriously. When you connect a repository to Mantle:
- Encrypted at rest and in transit — Your code is protected with industry-standard encryption throughout our infrastructure.
- Isolated per organization — Your codebase is completely separated from other customers. There's no cross-contamination or shared access.
- Indexed, not stored raw — We create vector embeddings for semantic search. Your raw source files aren't exposed or stored in plain text databases.
- Minimal access scope — When connecting via GitHub or GitLab, we request only the permissions needed to read repository contents. We never write to your repositories.
- You control what's connected — Choose specific repositories to connect. You can disconnect or delete indexed codebases at any time.
Enterprise customers: Contact us about additional security options including VPC deployment, audit logs, and custom data retention policies.
How agents use your code
With a codebase connected, your agent gains access to powerful code research tools:
- Semantic search — Find code by meaning, not just keywords. Ask "where is payment processing handled?" and get relevant results even if the code doesn't contain those exact words.
- Text search — Search for specific function names, error messages, or code patterns.
- Hybrid search — Combine both approaches for comprehensive results.
- File browsing — List files by directory or language, view file structure, and get repository statistics.
- Reference tracking — Find where functions are defined and where they're used across the codebase.
This means when a customer reports "the sync fails after updating settings," your agent can search the relevant code, understand the flow, and identify likely causes—dramatically improving the accuracy of its suggestions.
Tip: Keep your connected codebase up to date. When you push significant changes, re-sync the repository so your agent has the latest context.
Recommended setup for codebase-enabled support
Connecting your codebase is a great way to improve accuracy, especially for bug reports and technical questions. Because agents with codebase access may reference your source code in their responses, we recommend having a human review any customer-facing responses before they are sent.
Our recommended approach is a tiered setup:
- Tier 1 — Automated support agent — A general support agent without codebase access that handles routine questions using your documentation and knowledge base. This agent can safely respond to customers automatically.
- Tier 2 — Codebase-enabled support agent — A separate agent with codebase access for technical investigations, bug reports, and developer questions. Use this agent with human review enabled so your team can verify responses before they reach customers.
This gives you the best of both worlds—fast automated responses for common questions, and deep technical accuracy with human oversight for more complex issues.
Insights and recommendations
Beyond response suggestions, AI agents can surface insights about tickets and customers. These might include:
- Customer sentiment analysis
- Escalation recommendations based on ticket history
- Related tickets or recurring issues
- Suggested actions like assigning to a specialist
Insights appear in the same sidebar as response suggestions, giving your team a complete AI-powered view of each conversation.
Training your support agent
The Support Sidekick works out of the box, but you'll get significantly better results by training it for your specific product and customers.
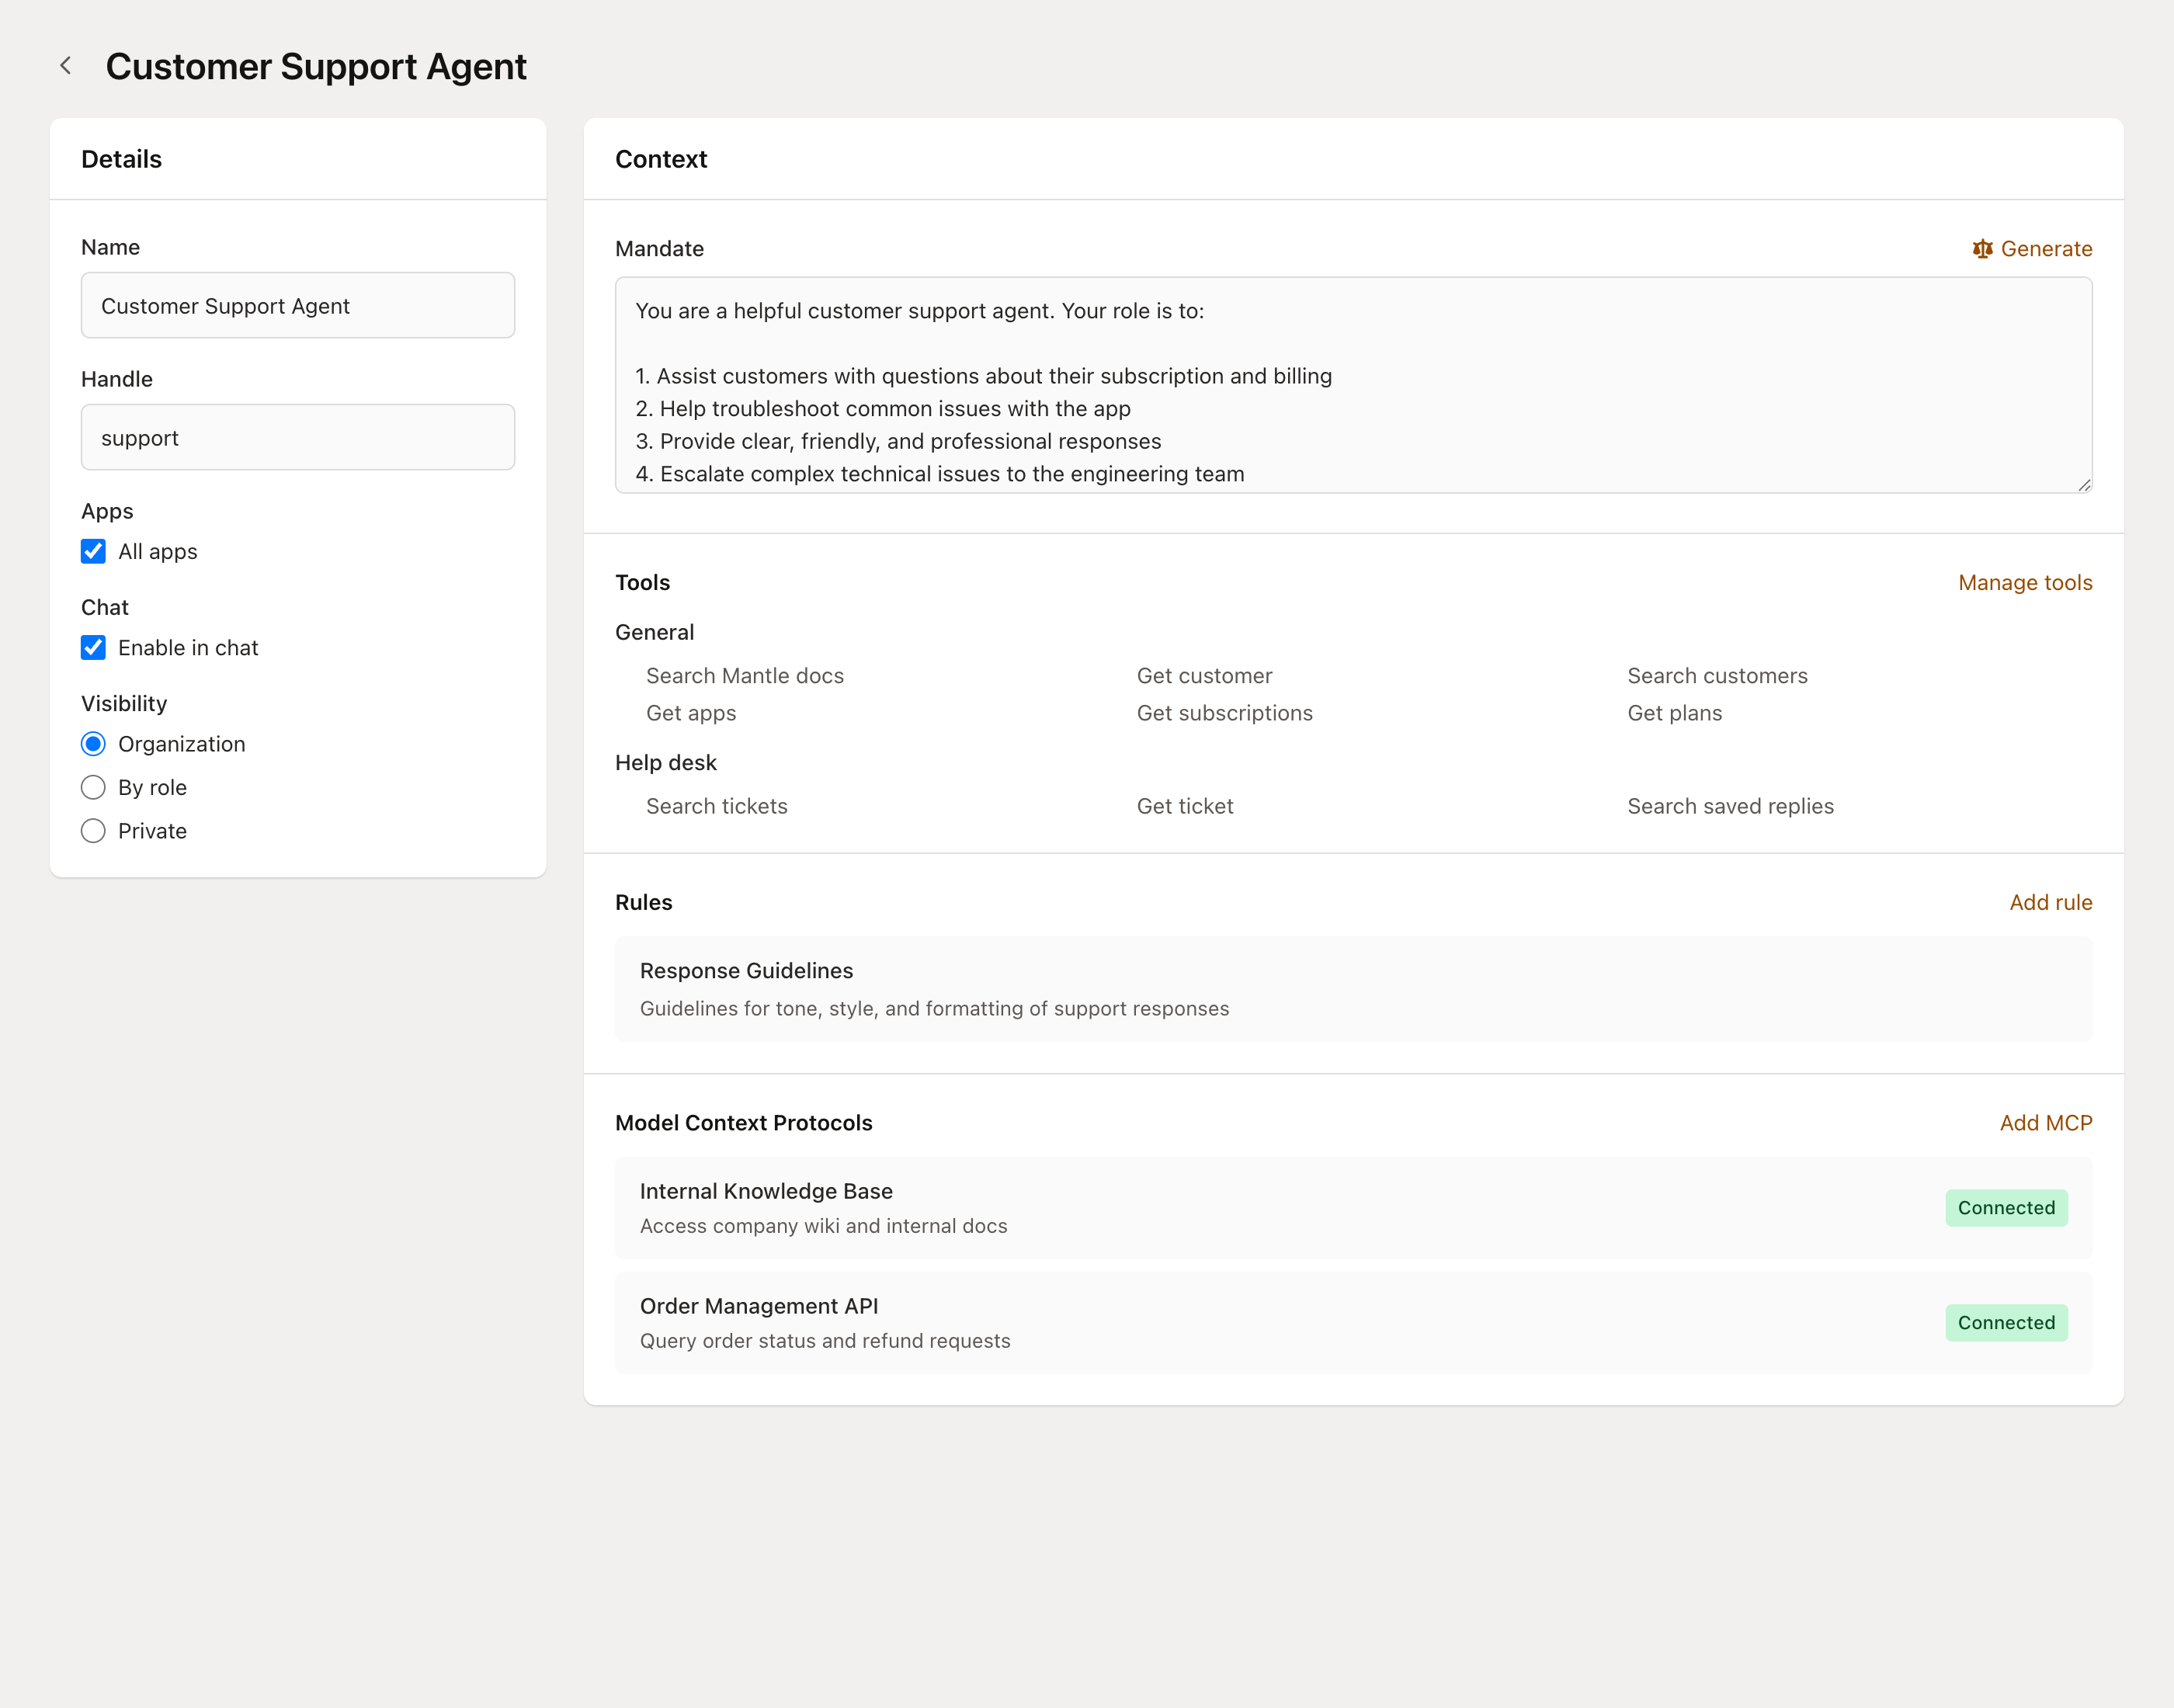
Customize the mandate
The mandate defines how your agent behaves. For support agents, focus on:
- Tone and voice — Should it be casual or formal? Technical or approachable?
- Product-specific context — What does your product do? What are the common gotchas?
- Escalation criteria — When should it recommend escalating vs. trying to resolve?
- Boundaries — What should it never do? (e.g., never promise refunds, never share internal pricing)
Add rules for edge cases
Rules are files that provide additional context. For support, good rules include:
- Common troubleshooting steps for known issues
- Pricing and plan details your agent should reference
- Internal policies (refund policy, SLA commitments, etc.)
- Product terminology and how to explain features to customers
Connect your documentation
If you're using Mantle's docs feature, the Support Sidekick can search your published documentation when drafting responses. This means answers stay consistent with what your customers can find on their own.
Connect your codebase
For technical products, connecting your codebase lets the agent investigate bugs and answer implementation questions with real accuracy. Connect a codebase from your app's Settings page, then grant the agent access from its Codebase access section. See the codebase section above for details.
For the full guide on configuring agents—including tools, rules, MCPs, visibility, and testing—see Configuring your agents.
Best practices
Start with suggested responses. Use the magic wand button to get comfortable with AI quality before turning on auto-responses. This lets you review every reply and build confidence.
Graduate to Flows for automation. Once you trust the quality, create a Flow that auto-generates suggestions on new tickets, then eventually move to auto-replies for routine questions. Use the "AI auto-reply to support tickets" template to get started quickly.
Write detailed mandates. The more specific your instructions, the better your agent performs. Include examples of good responses and explicit guidance on tone.
Use rules for consistency. If you have brand guidelines or specific formatting requirements, add them as rules so the agent follows them consistently.
Connect your codebase for technical products. If you're supporting a technical product, connecting your codebase dramatically improves the accuracy of bug investigations and how-to answers. Connect it from your app's settings, then grant agents access.
Have a human review codebase-informed responses. Agents with codebase access may reference source code when drafting replies. We recommend having a team member review any customer-facing response generated with codebase context before sending it.
Test before enabling auto-responses. Use the agent debugger to simulate ticket analysis before turning on chat widget auto-responses. Response suggestions (which require human review) are safer to start with.
Review and iterate. Check the suggestions your agent creates and refine the mandate and rules based on what works.
Go further
- Customizing AI Auto-Reply Flows — Configure escalation tiers, output schemas, and ticket routing
- Configuring your agents — Customize mandates, tools, rules, codebases, and more
- AI agents — Overview of Mantle's agent system
- Support channels — Set up email, chat, and other support channels
- Flows — Create automated workflows that include AI agents
- Using agents in Flows — Detailed guide on the Run AI agent action
- Getting started with help desk — Overview of Mantle's help desk features