

Sending emails
Once you’ve crafted the perfect email, it’s time to get it to your audience. Mantle makes this process straightforward while providing tools to ensure your emails perform at their best.
After you’ve finished creating your email content and saved your changes, you’ll be brought back to the email settings screen. From here, you can:
Select your recipient segments
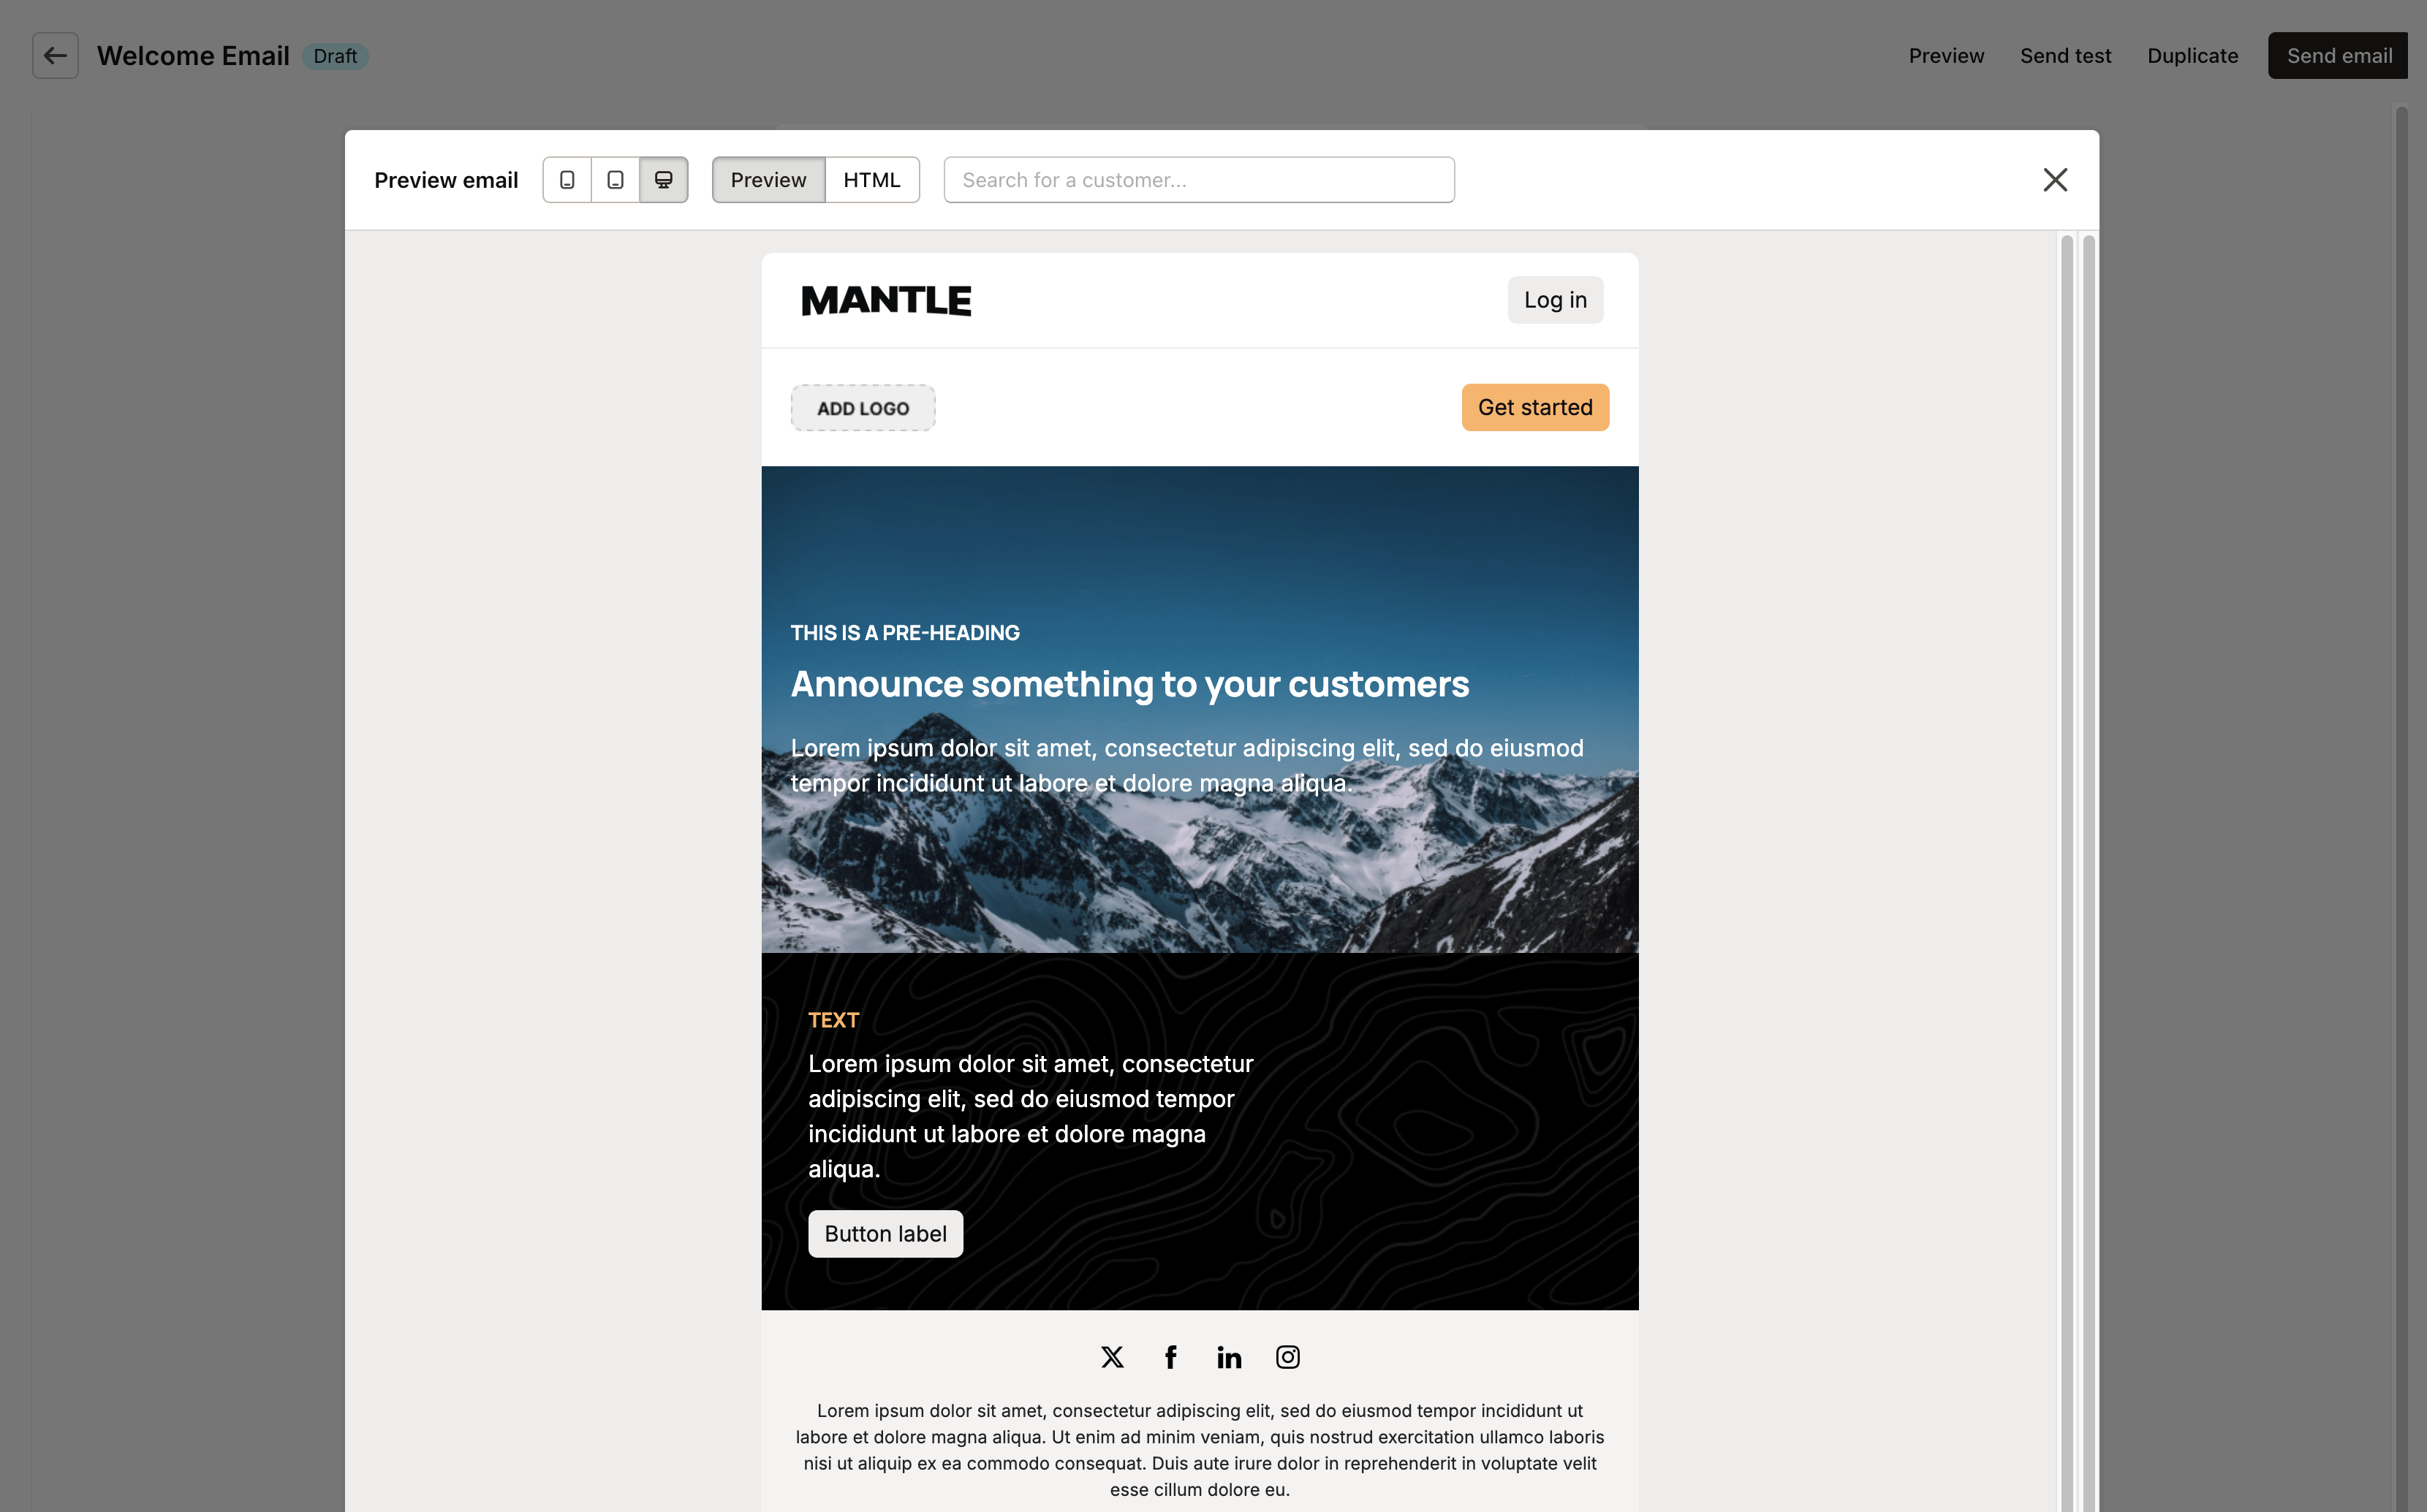
Preview how your email will appear to recipients
Send test emails to yourself or team members
Ways to send emails
Mantle gives you multiple options for sending emails, depending on your needs:
Manual sends: Create and send one-time emails to specific segments of your audience. Perfect for announcements, newsletters, or time-sensitive promotions.
Event-triggered emails: Set up emails to send automatically based on three types of events:
App events: Customer installs app, uninstalls app, reinstalls app, reviews app, or trial expired
Subscription events: Subscription is activated, cancelled, upgraded, downgraded, frozen, or refunded
Usage events: Specific tracked actions like page_view, order, user_session_start, or custom events you define
Flow-triggered emails: Create automated sequences based on customer behavior or timelines. Learn more in our Flows documentation.
Emails in flows
When using emails as part of a Flow, it’s important to understand how the responsibilities are divided:
How flow emails work
Flow emails are configured exactly like any other email in Mantle. The only difference is when and why they’re sent:
The email itself controls:
Content and design
Who receives it (all recipient targeting)
Contact selection
Personalization
The flow controls:
The trigger that initiates the email
Any delay before sending
The sequence within your automation
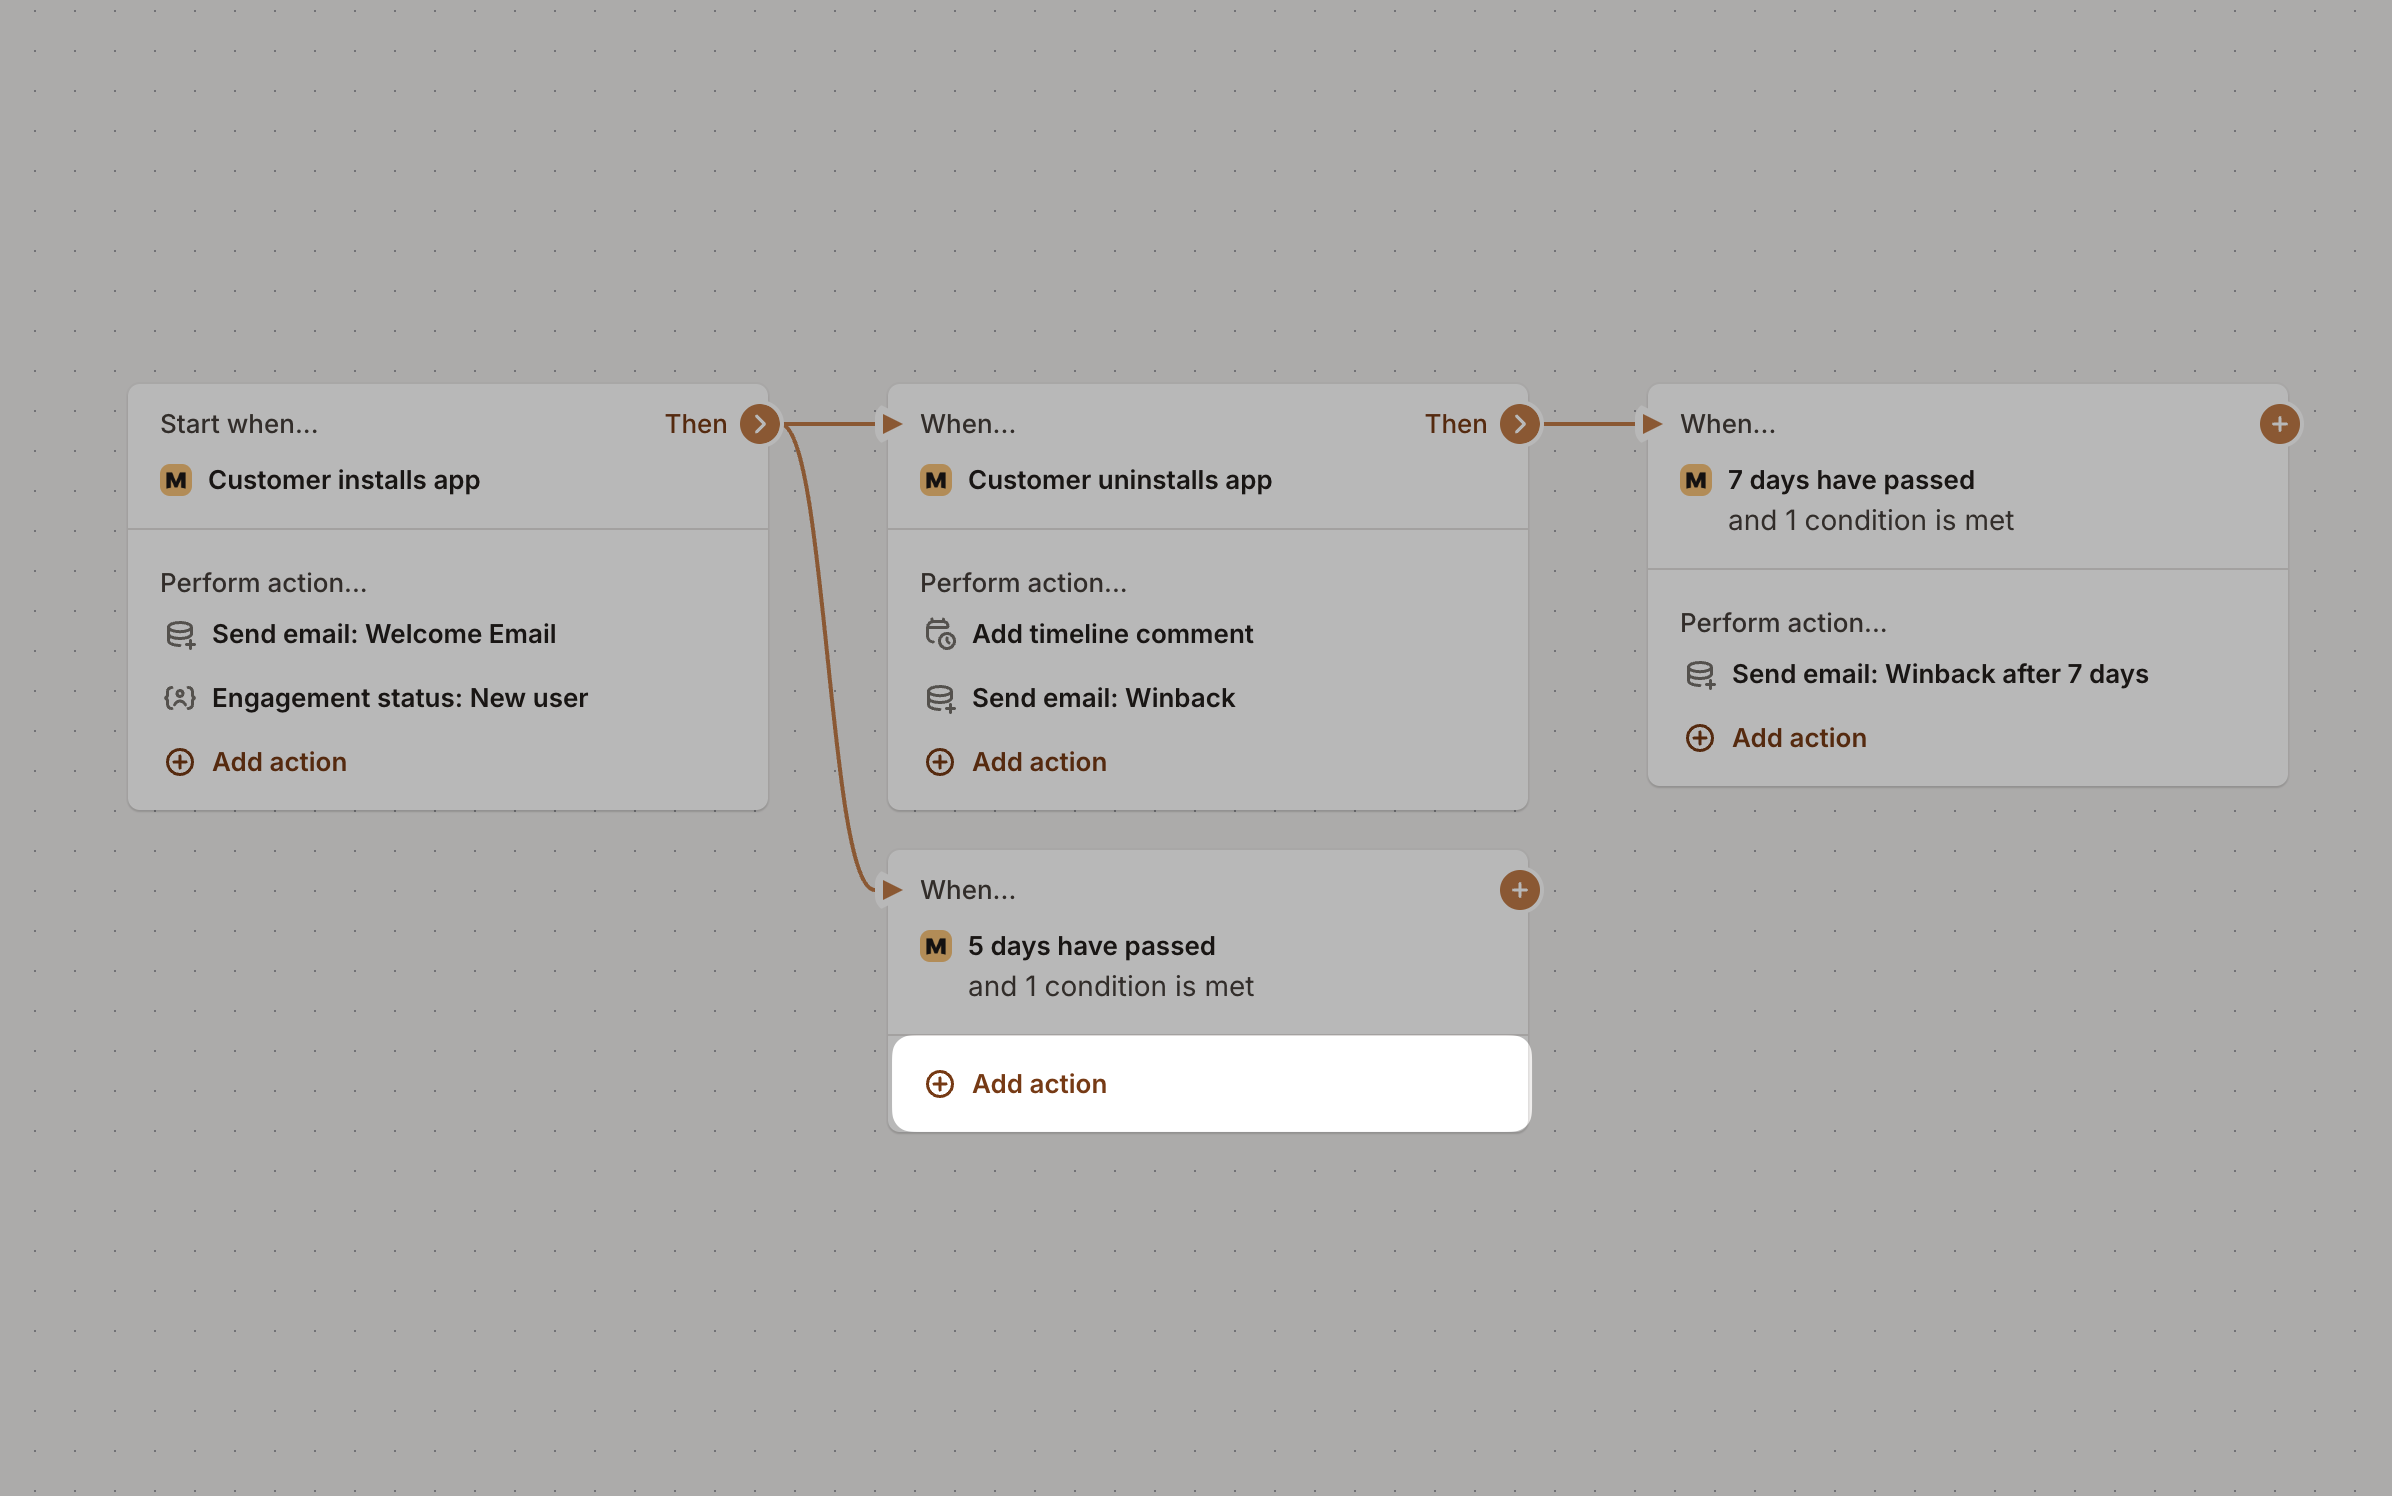
This separation means you have complete control over the email content and audience while the flow handles the timing and automation logic. You can even use the same email in different flows or repurpose emails from manual campaigns in your automated sequences.
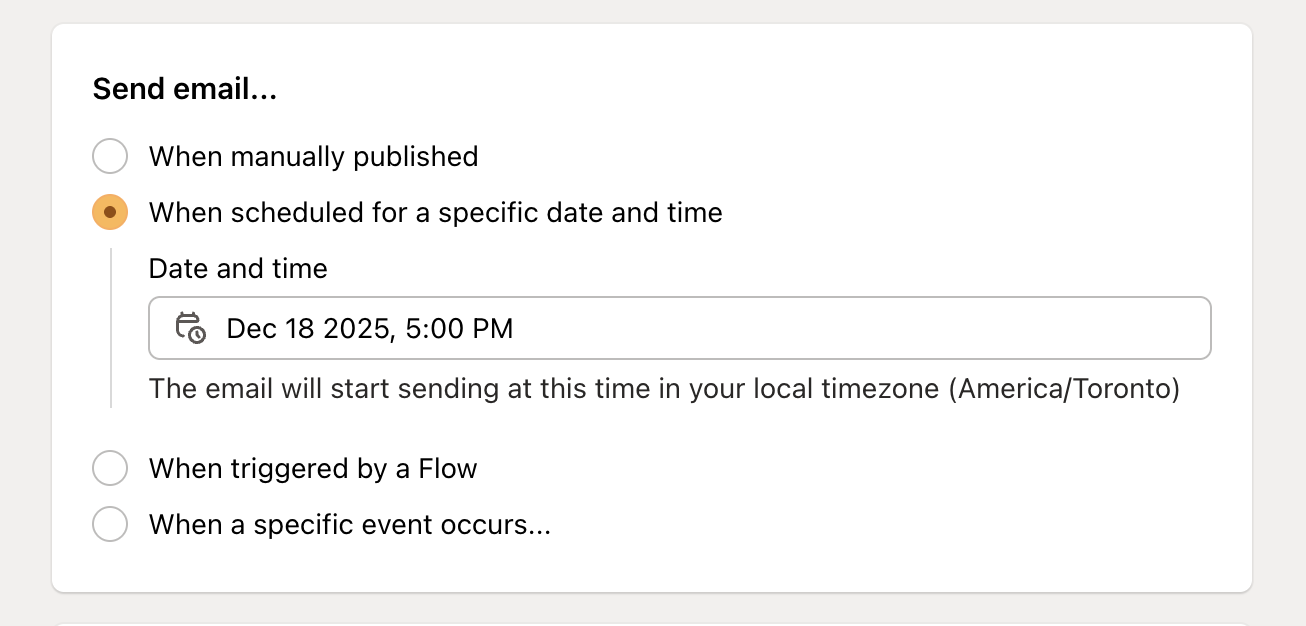
Scheduling Emails
Scheduling emails in Mantle empowers you to deliver the right message at the right time. Whether you want to announce a product launch, send a newsletter, or follow up with customers after a key event, scheduling ensures your communications are timely and relevant.
Why Scheduling Matters:
Reach customers when they’re most likely to engage, such as during business hours or after a specific action.
Coordinate announcements or promotions to align with product releases, holidays, or important milestones.
Save time and reduce manual effort by planning campaigns in advance.
Common Use Cases:
Send a one-time announcement for a new feature rollout at a specific date and time.
Schedule promotional emails to coincide with sales events or holidays.
Specifying email recipients
Mantle gives you precise control over which contacts receive your emails:
Default recipients
By default, emails are sent to:
The default Shop email (the primary email associated with the merchant’s account), or
The primary contact, if one exists
This ensures your emails reach the right inbox even if you haven’t set up detailed contact management.
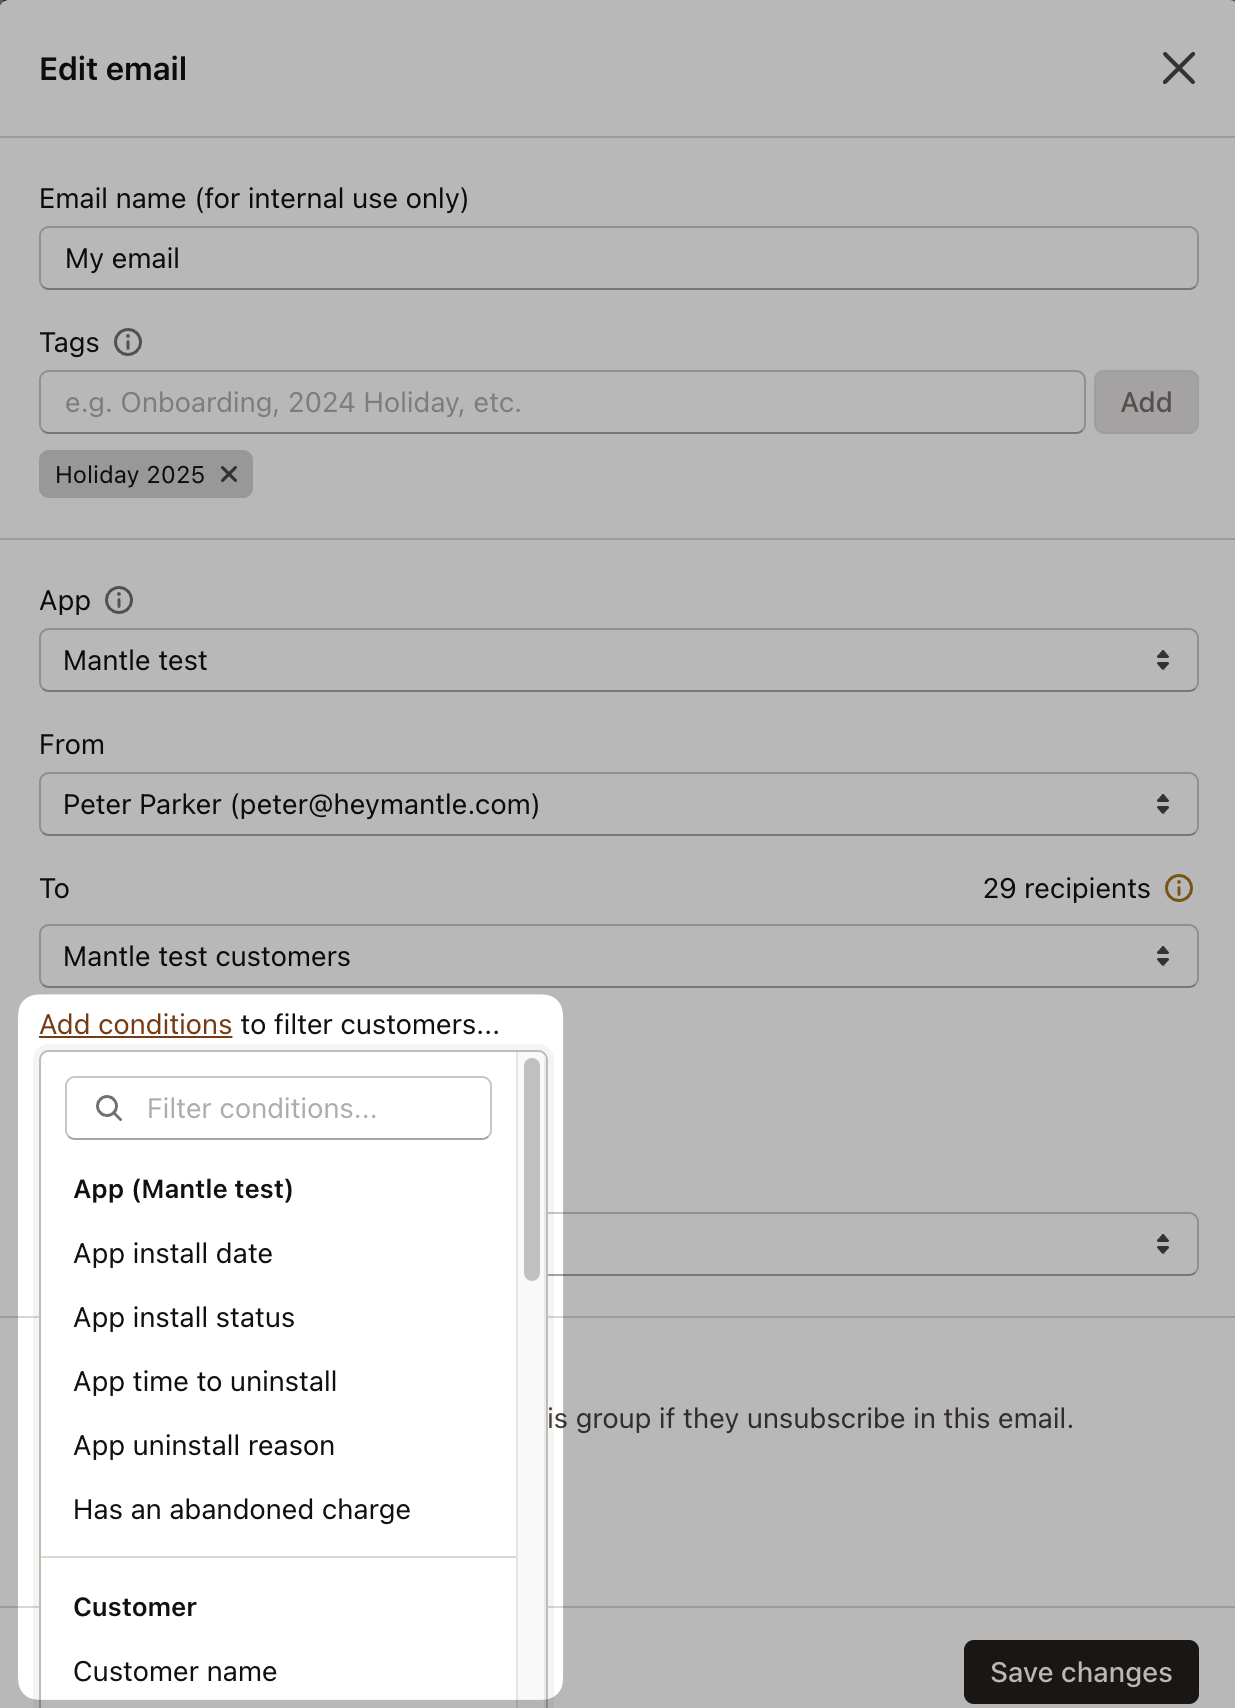
Advanced contact targeting
For more targeted sending:
In the email creation screen, look for the Send to section
You have two main options:
Click Add conditions to filter which customers receive the email
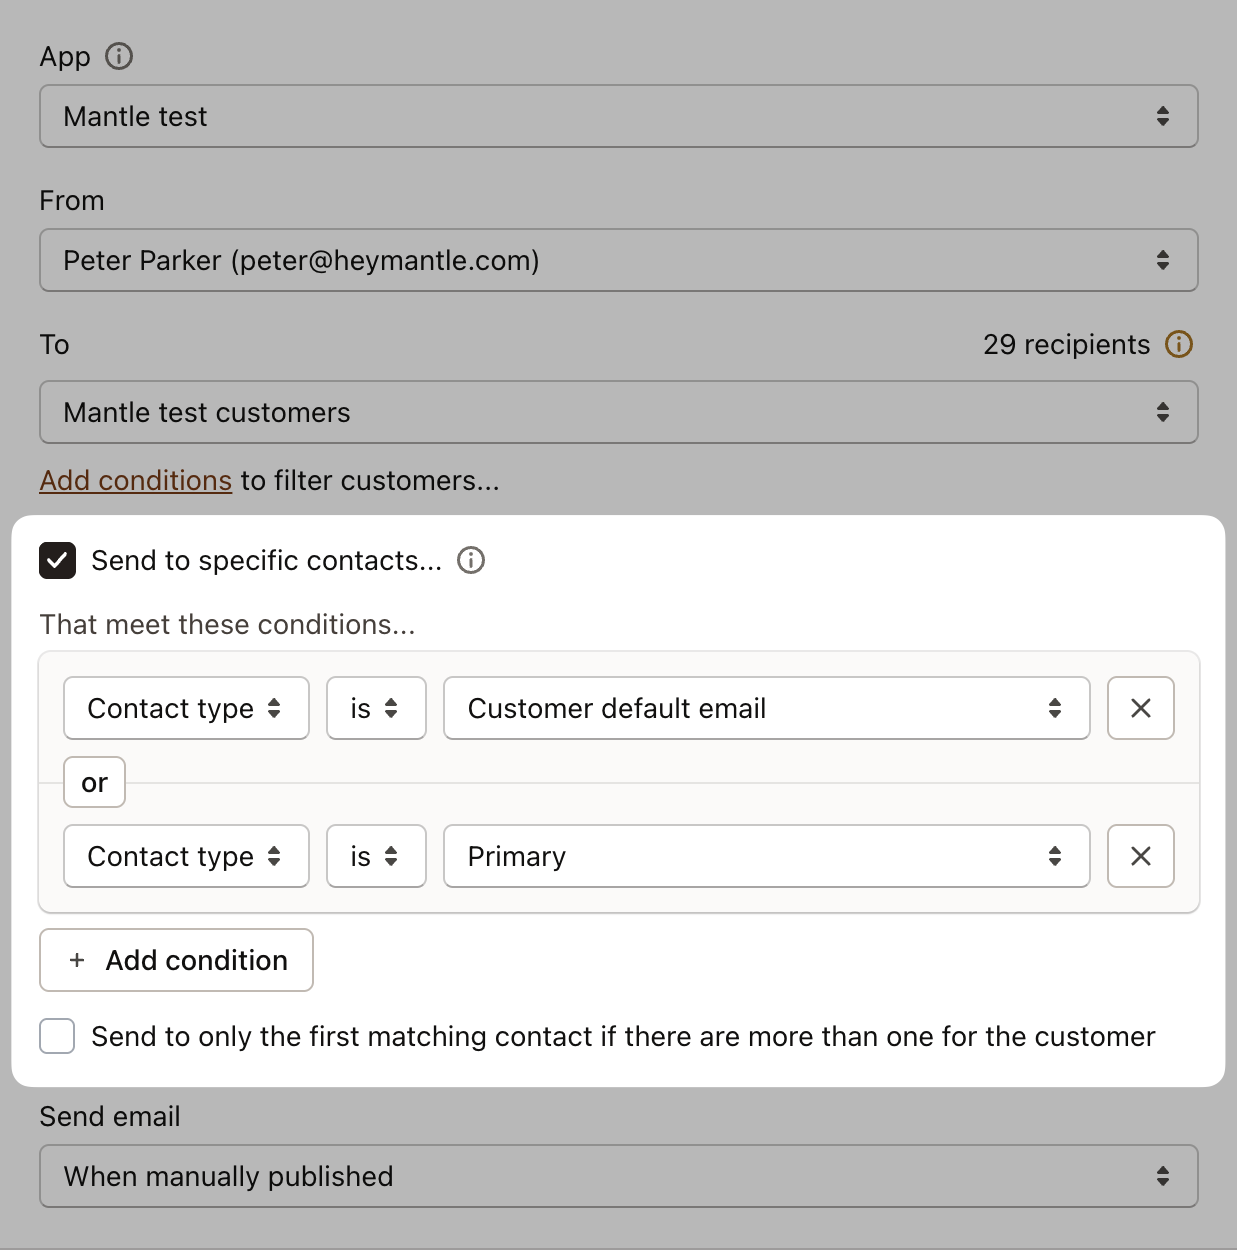
Click Send to specific contacts to target particular contacts within those customers
First, you can add conditions to determine which customers should receive your email:
Then, you can specify which contacts within those customers should receive the email:
With these options, you can:
Specify which contacts within those customers should receive it (Primary, Technical, etc.)
Apply additional filters like tags or custom attributes
This two-level approach gives you precise control over your email audience.
Using customer segments
One of the most powerful ways to target your emails is by using customer segments:
First, create a segment in the Customers section based on criteria like:
Plan type
Subscription status
Usage patterns
Geography
Tags
And many more…
When creating an email, select this segment under the recipient conditions:
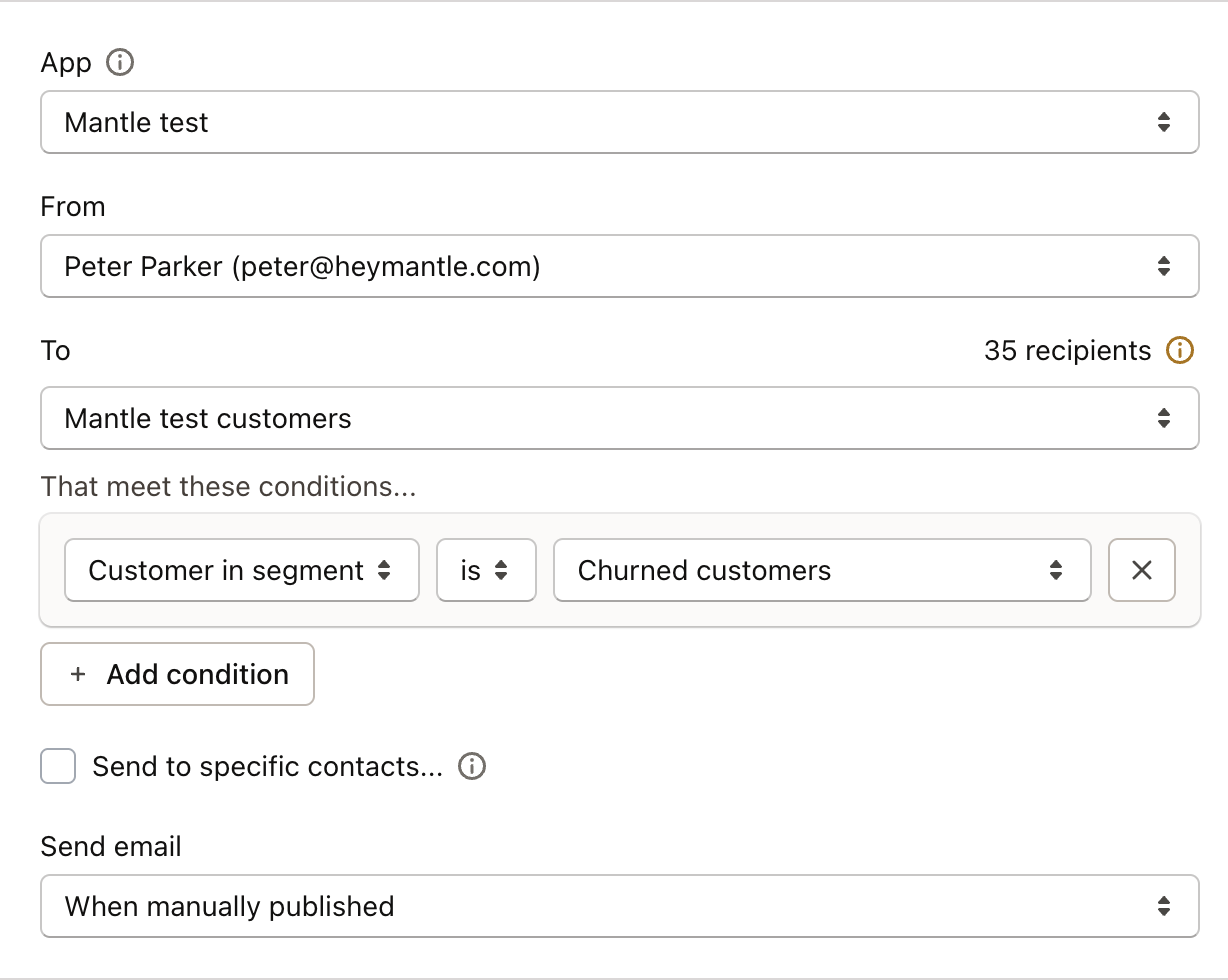
This approach lets you create highly targeted emails for specific groups of merchants, like “High-value customers on annual plans” or “Recently installed merchants with low feature adoption.”
Tracking performance
After sending your email, Mantle provides comprehensive analytics to measure its impact. Visit your email report to see key metrics:
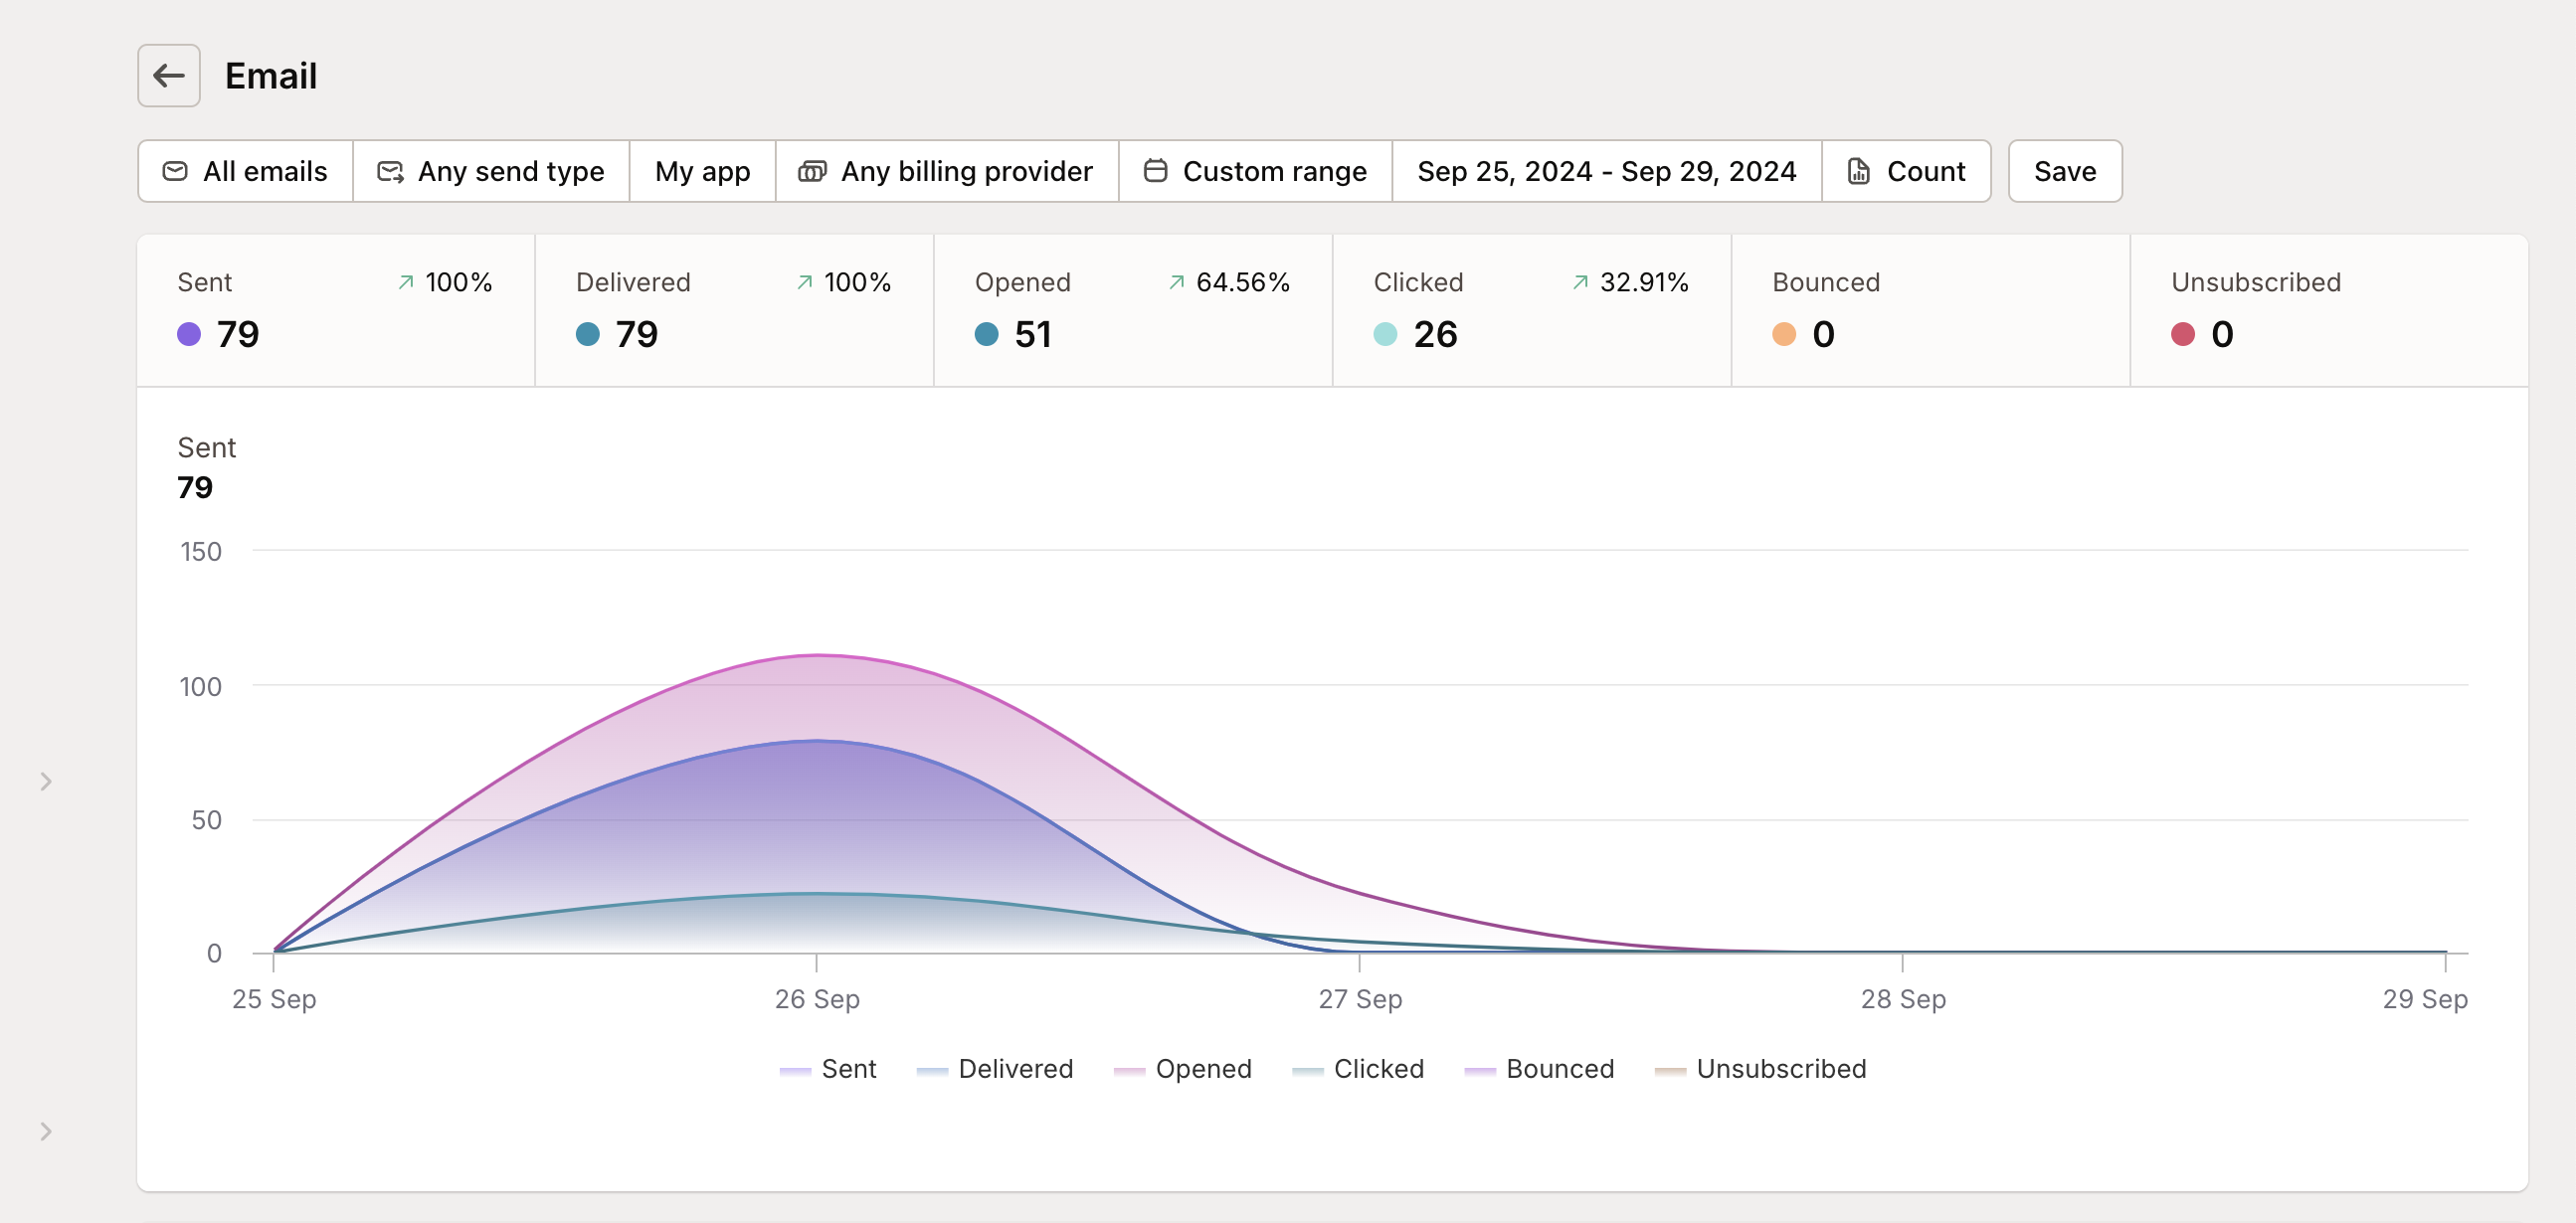
The report tracks essential metrics including:
Sends: Total number of emails sent
Deliveries: Emails that successfully reached inboxes
Opens: Recipients who opened your email
Clicks: Links that were clicked in your email
Bounces: Emails that couldn’t be delivered
Unsubscribes: Recipients who opted out
These metrics help you refine your approach for future campaigns and identify which content resonates with your audience.
Managing unsubscribes
Mantle automatically handles unsubscribe requests in compliance with email regulations:
Recipients can unsubscribe via a link in every email
Unsubscribed contacts are removed from future mailings
You can view unsubscribe reports in your email analytics
To manage your unsubscribe groups and settings:
Go to Email in the main navigation
Select Settings from the dropdown
Click on the Unsubscribe groups tab
Here you can create different unsubscribe groups for various types of communications (marketing, product updates, etc.), allowing contacts to opt out of specific email types while still receiving others.
Testing before sending
Always send test emails before launching your campaign. This gives you a chance to:
Verify all links are working correctly
Ensure images display properly
Check how your email renders on different devices
Confirm your personalization tags are working as expected
To send a test:
Click the Send test button on the email settings screen
Enter the email address(es) you want to receive the test
Review the email when it arrives in your inbox
Ready to take your email strategy to the next level? Check out how to create powerful segments for even more targeted messaging.